 I don’t know about you all, but I am definitely a visual person. I do enjoy reading, but when I am on the internet, I really like to see photos and even some ‘how to’ ones along the way. (even if they aren’t so pretty!) That being said, I am trying to include what I would like to see.
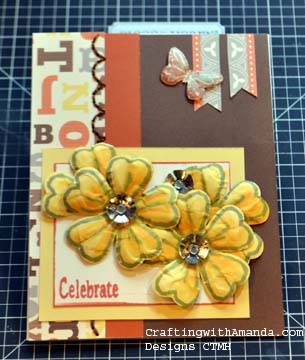
I made this card, two versions actually with the left overs from the two previous cards. I should have been cleaning up my supplies and transitioning over from spring/summer to autumn/winter products, but these scraps were just sitting on my desk waiting to be used!
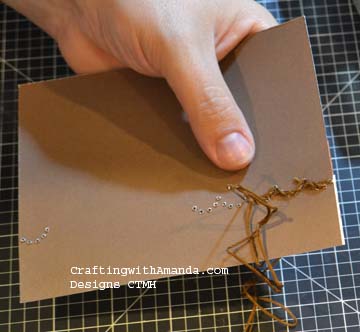
The card front is chocolate CS. On that I placed a left over strip with letters to the left and another scrap of autumn terracotta next to it. I used the brand new stitch guide to pierce some holes in a scallop pattern, then using a simple backstitch filled in the holes with chocolate floss.
The new stitch guide is amazing. You just line up your paper with one of the grid lines and using a piercing tool punch through each hole. I’ve found I work faster if I punch through the front with the piercing tool, but stitch holding the card with the back side facing me.

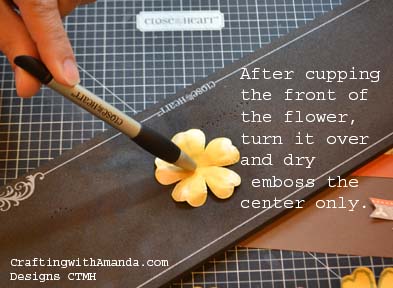
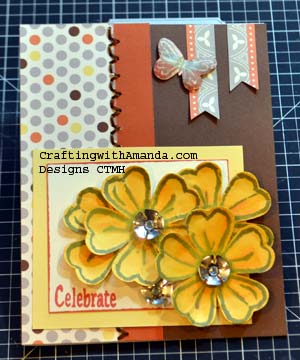
If you don’t know this, I love that the cricut cartridges work with our stamp sets so perfectly. I used Art Philosophy and an old workshop stamp set “Lucy” to create these flowers. I cut them out of colonial white and then colored them using buttercup and sorbet makers. I stamped the flower outline in slate. After they had dried I used the rub on tool and the mat for the stitch guide and dry embossed the flowers. (see photo right & below.)
I forgot to mention I was using card number 28 from the Make if From your Heart Vol2 as my inspiration piece. I cut a scrap of buttercup cardstock (3.5×3) and Colonial White CS (2.5 x 3). I matted the colonial white on the buttercup and stamped the word “celebrate.” I then attached the flowers with glue dots and added the new metal flowers.
Each CTMH pattern paper comes with a zip strip along the top that tells the paper name and coordinating colors on one side and some patter or words on the other. I cut two pieces from the zip strip (1.25 & 1.5), made ribbon ends on them and attached them to the upper right of the card. The inspiration piece had a button as an accent, but the Lucy stamp set had a butterfly that coordinated with the Art Philosophy cartridge, so I cut out a butter fly and then rock and roll stamped it to create the multi colored wings. Always practice so you can get the feel of how far to roll the stamp into your ink. (see my scrap paper!)
I always line my colors up lightest shade to darkest. This will help me from putting darker ink on the lighter pads. So I ink my full stamp in my lightest color. In this case Crystal blue.
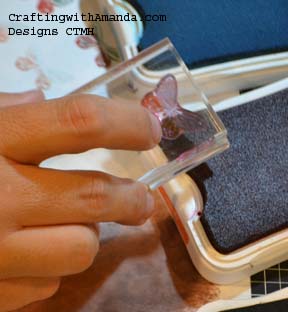
In the next color, sunset, I tip the block to just get ink on part of the stamp. (The bottom of the butterfly)
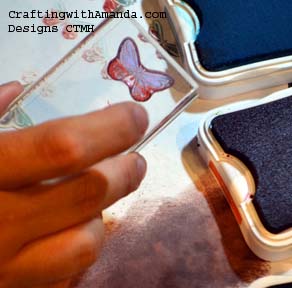
You can see where you have your ink when you use Acrylic Stamps. (another reason to love them!)
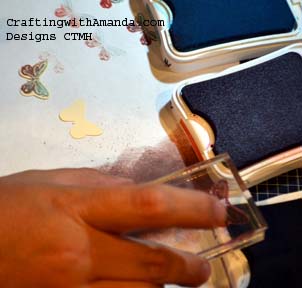
Then with my darkest color, Slate, I roll the top of the butterfly into the pad.. You can see on my scrap paper that I practiced a few times to help me reach the effect I was looking for. I didn’t like the rocking and rolling I had done in a different order, but when did it the way described above I liked it. I recommend doing several different combinations of coloring to find what works for you and your project. Once you have it all inked up, line it up on your precut shape and watch your butterfly transform. I have a small craft foam pad under my scrap paper. It helps ensure a good stamped image. You can also use the foam that comes in the My Acrylix stamp sets as well.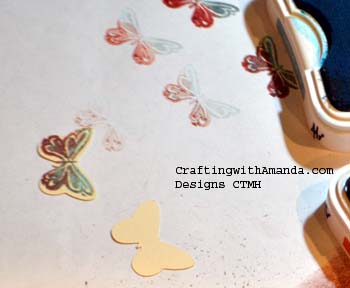 After I stamped the butterflies, I added some more Slate ink around the edges to blend the colonial white CS that was peaking through.
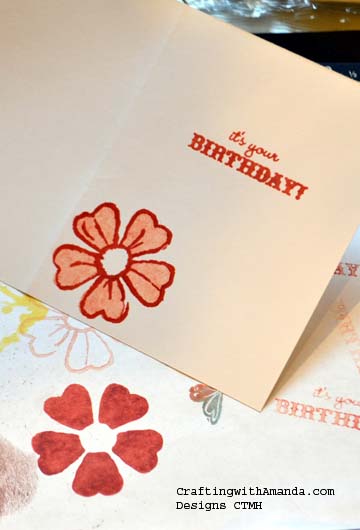 Another stamping technique I used on this card is second generation stamping with our two stamp images. Still using the Lucy stamp set, I inked up the solid flower petals in Sunset and stamped it on my scrap paper, then without re-inking I stamped it again on the inside of my card. This made for a lighter shade of Sunset. Then I used the outline flower stamp and sunset and lining up my image stamped over my solid flower petals. I will sometimes drag the bigger solid images across the stamp pad to give it a different effect, or twist it. Try out several different inking scenarios to see what will work best for you.
Here’s a look at the other card. Everything is about the same except I dry embossed the flowers so the petals would curl up and I used the polka dot side of the patterned paper on the left edge. I also choose a different stitch pattern so I can learn what I might like to use latter on my scrapbook projects.
Happy Crafting!

Like the way you added the flower to the inside of the card. I never think to dress the inside up. Very cool!
The new stitch guide looks like a great little tool. Can’t wait to get one myself!