I found a minute to do some crafting, then another minute to edit some photos, and now I’m squeezing in a moment while the kids eat a donut to post the results.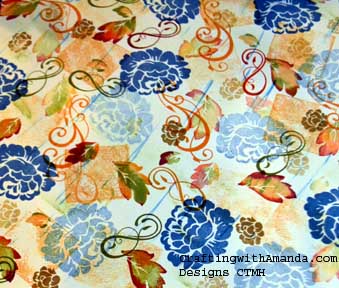
This week at our monthly club night I’ve decided to do random stamping, then cut that sheet and create some cards. The ladies love, I mean, LOVE to random stamp, and it’s been a while since we’ve done it. We have some new girls that have joined us and they need to be initiated into the joy of random stamping!
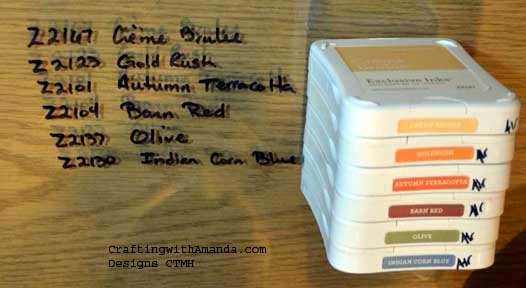
Indian Corn Blue is one of my favorite colors, and when I am having a stressful day, or can’t decide on what colors, this is a go to for me. So it will come as no surprise to those that know me that the biggest image is done in Indian Corn Blue. Here are a list of what I used to create this wonderful paper.
 In addition, I swiped with Sky blue ink as my very last step.
So, random stamping is just that, random, right? No, not so much. My husband is an computer engineer, and he often reminds me there is no such thing a random. Random stamping is a great technique of layering. You can achieve many different looks with the same sets of stamps and ink. You can create themed paper to match your event or set the tone on an invitation or card.
Where to begin? Random stamping was one of the first techniques I taught myself. I had looked on line and had a definition of random stamping, and even some suggestions of stamping images in triangles, but when I tried that, I wasn’t happy with the results. I will attempt to share with you what I do to create my custom paper.
First I choose all of my stamps and select the ink colors I want to use. Today I choose Happy Autumn and Swirls Around Flair as my stamp sets. My inks are shown above. I like to arrange my inks from lightest color to darkest color. This is incase I want to do some “rock and roll” stamping I have my ink pads already in place and don’t have to worry about putting a darker ink on a lighter colored pad.
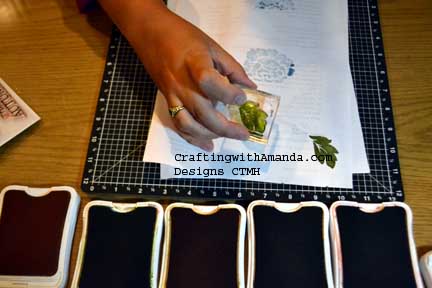
I grabbed a couple sheets of scrap typing paper and a sheet of colonial white. (I like the softer tone in Colonial white for the autumn colors.) I choose the largest image first and go smaller and smaller as I continue to create my paper. I found if I stick to one color for each image the results are less “muddy.” You may find you like the look of each image in all the colors, but for me it was too busy. 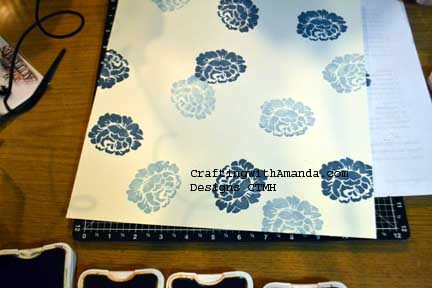
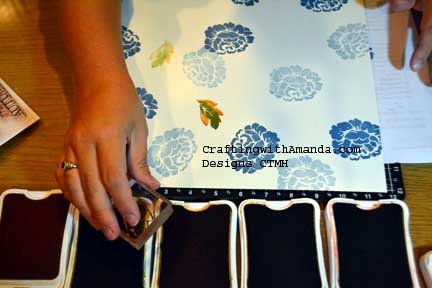
I do like to use 2nd and sometimes 3rd generation stamping to add depth. (first generation is you ink and stamp, 2nd generation, don’t re-ink, stamp a second time after your first stamping of the image.) Also be sure to stamp off the edge of the paper.
 For my leaf I decided I wanted to rock and roll. I was able to continue adding second generation with this as well.
 The Olive ink was a little darker than I wanted all the time, so I sometimes inked up the image then stamped it on my scrap paper before I continued to rock and roll the image into the other colors.
One more tip that works for me and took my random stamped sheets from good to wow was being sure to overlap some of the stamped images. In other words don’t leave a space around each image.
An exception to starting with my biggest image is any swirls or frills that I use towards the end of my creation.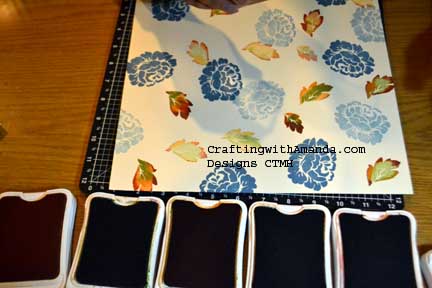
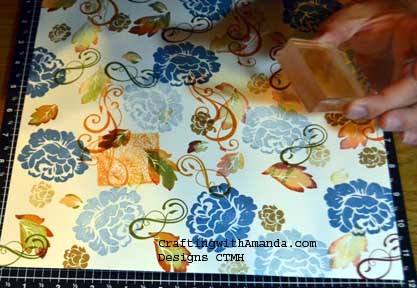
I wanted some more color on my creation, and if my 3×3 block had been handy, I would have used that, but as I didn’t want to leave my chair to search for the block I made due with my 2×2. Without putting any stamp on the block, I inked up the surface and stamped the square on my paper. Again you can do second generation stamping with this technique as well. I think if I would have had my bigger block I might have called it good, but still seeing so many open areas I decided to swipe the sky ink directly on the paper. So now that I have created my paper, need to figure out a cutting guide for my ladies to use on Thursday to create some cards. I hope to post those tomorrow, but we’ll see what tonight brings. I need to make lunches and get both kids ready for school, fingers crossed!
Happy Crafting!

Looking forward to Thursday. You are correct, I simply LOVE random stamping! It is such a fun thing to do and puts some lovely effects on cards and layouts.
I love to random stamp. It’s so much fun to see the finished product! I may have to do some tomorrow!